Showing posts with label craft. Show all posts

Friday, September 5, 2008

Luchador to Order


I thought this was pretty cool.  A very nice person bought one of my Luchador mask necklaces and asked if I could do a purple one.


I came across quite nice one, white with purple edging, belonging to Mil Mascara during the 1960s (he wore quite a variety of masks) and made the necklace as a a custom item.  

I think it turned out pretty well J

Wednesday, June 25, 2008

Single Lucha Libre Mask Necklaces

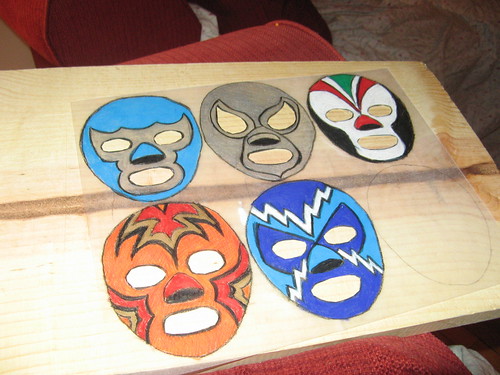
Loyal fans of this blog may remember these cute little luchador masks from my Shrinky Dink Ruler tutorial. I made them waaaay too big to have five on a necklace.

I originally toyed with the idea of making them into magnets but I thought a single layer probably wasn’t strong enough to deal with the day to day realities of being on a fridge. I didn’t want to just get rid of them because they’re quite nicely done. What to do.

I can’t think why it took me so long to remember Lauren’s suggestion that I make necklaces with one single mask. Here they are! A single mask on a ball chain necklace. They’re very attractive and tough at the same time. Apparently I’m not the only one who thinks so because I sold Blue Demon last night! I’m sort of hoping Aztec Skull doesn’t sell because I want to keep that one, but etsy is all about clearing your toy collection so you can make more toys!

Since all of them besides Blue Demon and Santo are original designs, I had to make up names for them (hence “Aztec Skull”). I decided not to go Spanish with the names for two excellent reasons: I know roughly 10 words in Spanish (half of them involve counting to 5) and I figure the majority of the etsy audience is in the same boat. Maybe 20 years from now my little Aztec Skull will be repeatedly bootlegged and I’ll see a real one in the ring. Heck, they did it with UltraMan.

Up for Sale! $4 per Necklace!

http://www.etsy.com/view_listing.php?listing_id=12740317

Wednesday, June 18, 2008

Life and Death of Peanut Men

I’ve always been crafty.

Mom is always amazed when she sees bored children since we were always investigating _something_. Jamie and I made quite excellent volcanoes in the sandbox with the garden hose (Mom built the sandbox! It’s genetic!) and Tom pretty consistently took every mechanical thing we own apart to see how it worked. I once tasted every flower in the backyard except for the dreaded deadly nightshade. Begonias are sweet and juicy. Tulips taste bitter and waxy, which is fortunate because they’re poisonous.

I also invented a weird gel by mixing white glue, washing powder, and spray starch. This had a strange gummy consistency but only stuck to itself. Very peculiar, but I recreated it several times. I believe it may have been a colloid.

I had a couple of craft books for kids (I was born in 1980, but most of the toys we played with were late 1970s) that featured kids in groovy outfits building exciting things. I can still feel the longing to create a life sized alligator out of paper mache and chicken wire, just like in the photos. They did have some smaller scale projects including peanut men.

Peanut men, or ladies, take advantage of the usual bi-legume peanut shell shape. To make, draw a little face on the upper half of the peanut shell. Add eyelashes or curly hair lines if the peanut exudes a feminine mystique. Stick a toothpick through the join of the two nuts for arms. Cut another toothpick in half and stick the two halves into the bottom shell for legs. Then find two single nut peanuts and stick them onto the leg picks. If you balance correctly (always a tricky situation for the under 10s) they’ll stand up.

I made a whole set of these on a hot summer afternoon and left them on a paper plate near the TV in the kitchen for the family to admire. The flaw here is that these people are made of delicious salted in the shell roast peanuts.

When I got up the next morning, disaster! Peanut shells and toothpick legs were spread with wild abandon. Salty carnage, the peanut men had been savaged by hungry dads during the night.

Friday, June 13, 2008

Summer Cream Beer Bottle Pie Magnets!

The latest creation from Chez Anthrid: Summer Cream Pies!

Summer Cream Pies include:


Strawberry Glaze: Tiny polymer canes slices form miniature strawberry slices carefully laid in concentric circles leading towards a bright ripe whole strawberry centerpiece. Layers of red tinted glaze make this just as glossy and juicy looking as the original.

French Silk: Thick polymer clay whipped cream tops a rich glossy chocolate base. All of this mousse-y goodness is topped with curls of dark chocolate. A slice is cut out to show both decadent layers.


Key Lime: Real key lime pies have a pale yellow, ever so slightly green tint from the fresh tiny limes. This miniature pie follows in their footsteps. Since key lime is so tart, a swirl of whipped cream topped with a minute slice of lime (less that 1/4 of a inch long) is a welcome addition.

Grasshopper: Rich chocolate pudding flavored with crème de menthe was a classic 1950s
concoction, inspired by the cocktail and this polymer clay pie matches up with a glossy chocolate filling topped with a dollop of whipped cream and bright green mini mint leaves.

Coconut Cream: This tropical treat consists of rich custard combined with pulverized coconut and coconut extract. This mini pie features a glossy luscious pale yellow filling topped with dollops of whipped cream sprinkled with toasted coconut.

Should you feel compelled, they're for sale at

http://www.etsy.com/view_listing.php?listing_id=12503097

Wednesday, June 11, 2008

THANKSGIVING Beer Bottle Cap Pies

I’m a big fan of Thanksgiving.

I like the whole concept of a day where you bring your family around and cook all day and then you eat when it’s all ready.

When I was a kid, we spent every Thanksgiving in Minneapolis, where a big dinner was followed closely by the pre Christmas trip to Daytons! Minnesota didn’t have sales tax, so a good little bunny could hope for a few presents. In fact, I got my very first gingerbread house kit on one of these excursions.

Obviously, it was a good move to judge by my turn to built gingerbread staburs and igloos. Maybe next Christmas I should do a gingerbread pig sty to house the darling marzipan pigs… Hmmm…

In any case, the highlight of Thanksgiving was always the pies! Mom and I are good pie bakers and there was a Trinity of Autumn flavors: Pumpkin, Pecan, and Apple. I’ve faithfully recreated them in a medium more likely to last past the holidays.

Behold!

Pumpkin pie is the classic staple. I’ll admit we always used canned pumpkin, but the results were creamy and rich. This miniature pie is filled with glossy reddish brown polymer clay custard and topped with a decadent swirl of whipped cream.
Pecan pie was preferable made with pecans straight from my aunt’s family home in Alabama. This bottle cap pie does have a layer of polymer clay caramel topped with individually made and detailed pecan halves. The glossy sweet look comes courtesy of syrupy glaze.

Apple Pie was our branch’s specialty. We made the real ones with Jonathans or Macintoshes we picked each year in Wisconsin. These little beauties are polymer clay segments held in with tinted glaze. The effect is completely that of a warm oozy apple pie.

Like the other ones, these are made in beer bottle caps, so they’re very small and have a little magnet affixed to the back. They’re now up on Etsy

http://www.etsy.com/view_listing.php?listing_id=12476951

Monday, May 12, 2008

The Legend of the American Science Center

Snazzy hat, eh? I kind of wish I had bought it now.

This fab chapeau is only one item available at American Science and Surplus! I guess they have a website, but I’ve only ever gone to the store. This last week I had a shopping list of 1mm glass balls, water syringes, empty jars, and a few other things. Last Halloween, Knut bought me a gorgeous little bat skeleton there. At the moment, it’s in a little mini mall and geared towards the trendy geek. Ahh… but when I was a lass it was different…

It used to be called The American Science Center and before that it was something like Genco? Anyway, it occupied a strange building in an industrial area with only a small sign to lead you into the Ali Baba cave of nerdy wonders within.

It was a big square room with a row of glass cases marking the staff area at the front and aisles of goodies. These were roughly divided into silly stuff and evil robot building supplies by a display of telescopes. The serious stuff was mostly things like alligator clips, mercury switches, motors, cables, etc. The silly side had pretty much everything else: old glove molds, laminated animals for dissection, tiny rubber pigs, the top half of Jabba the Hutt dolls, jars, rabbit pelts, plastic organizers, magnets, and spools of mylar. Each item was in its own bin with an amusing card stating the name, price, and usually a bad pun. In the glass cases were optical illusion kits, real anatomical specimens, vintage gas masks, and sea monkeys. This was an excellent place to buy both wall-y-walkers and replacement rotary phone cords (turquoise only). Various doodads hung from the ceiling or were pinned to the walls.

I was pretty much the only child in there at the time and now it’s more geared towards science projects, but they seem to be doing well. It’s pretty darned neat.

Thursday, May 8, 2008

Bottle Cap Pies cont'd

I have the bottle cap pies in my purse right now. During my lunch break, I usually go to a pretty little secluded area and relax. There are lovely goldfinches, cardinals, deer, butterflies, and the occasional raccoons there and you’d hardly believe it was in an industrial area. Generally, I have the place pretty much to myself.

I thought I could snap a few nice photos for Etsy while I was there and as soon as my bunny themed bento box was emptied, wouldn’t you know it? 4 cars pulled in and essentially turned it into a parking lot.

CURSES!!

I am a shy retiring thoughtful rabbit! I do not want sweaty men in polo shirts asking “Whatcha doing?” while I pose miniature pies on a fence post!

I did it anyway. They turned out pretty nice, I think, but I won’t know for certain until I take them home and upload them to the computer.

I really am please with the pies themselves. I really did a lot of fine detail work on them. The blueberry and raspberry pies are filled with tiny glass balls and then layered with glaze. The rhubarb is filled with tiny red plastic logs that are held with red tinted glaze. It really looked like a juicy pie that spills over when you cut a slice. The lemon meringue is nicely browned on top with brown glaze and the lemon filling is glossy with just a tiny bit of juice leaking onto the pan. The galette is tiny peach slices, each with whirls of subtle colors, coated in yellow glaze that looks like apricot jam.
And they look very cute on the refrigerator.

I tried out my professional grade Sculpey on these and I am really pleased with the quality. I think they could take a tumble and not chip

UPDATE!!

It's up:   http://www.etsy.com/view_listing.php?listing_id=11633787


Wednesday, May 7, 2008

Beer Bottle Cap Pie

Jeez, that sounds like one of those horrid novelty red neck items, doesn't it?  I'll have to pick a different name when I put these up on Etsy.   
I love pies.  Baking them, eating them, and now fabricating them!
These little pies look good enough to eat, but you'd probably break a tooth.  The pie pans are literally bottle caps (MGD and Goose Island.  
Knut's choice as he's the beer drinker).  The pies themselves are polymer clay, glass beads, and tinted glazes.   They're affixed to little magnets to make sweet little fridge decorations.  Don't worry, they're good magnets.  I tested them on a heavy postcard from Istanbul.  
Our flavors are raspberry, blueberry, lemon meringue, rhubarb, and a dainty little peach galette.   Yum!
Up on Etsy as soon as I can take photos in daylight.  
I'll take pie over cake any day, so these were definitely a labor of love.

Tuesday, April 15, 2008

So Miss Sewing

A little while ago, I tugged Knut’s heart strings when I called him from work and told him I wanted to go home and sew.

I really miss sewing and it’s not something I’ve been able to do much lately. In fact, right now I’m wearing pants that I’ve been meaning to remove the pockets from since I bought them!

For one thing, it’s hard to judge colors correctly under artificial light. Purples can look brown, navy can look black. And when you’re tired you make mistakes. It’s also a more expensive hobby that playing with polymer clay or shrinky dinks! People don’t understand that once you’ve bought all the materials necessary to sew something by hand, it’s often more expensive than buying a Chinese made mass produced item. If you’re a non sewing person, that's why a person might wrinkle their nose when you say “$40! You could make that!”

What I love doing is making these luxurious patchwork lap quilts. I used leftover bits of all the gorgeous materials my mother has used over the years. They contain silks, velvets, satins, high quality polyesters (which can be as fine as silk and more expensive!), wools, brocades, and anything else we have lying around. Some of the fabric is more than 50 years old.

Normally, I sewed the patchwork, added the borders (I like to use nice velveteen for this. It’s sturdy, turns great corners, and feels good), layered the backing and batting, tie it, and then bind the edges.

The particular quilt in the photo is one I made for my mom for Christmas one year. This turned a little different. I chose a beautiful rust panne velvet for the borders and turned the patchwork into a diamond pattern to make it a little more special.

Yikes!

This was a challenge. The velvet was super slippery and the pattern meant I really couldn’t machine sew it easily. Welcome to Baste City. I had to do it all by hand. And when you’re trying to do something like that by laying it out on the floor, naturally a fluffy little dog find it the nicest place to have a little nap. He seems to prefer good quality fabrics.

Ahhh.. memories. One day soon I'll whip out that little machine :)

Thursday, April 3, 2008

The Amazing Shrinky Dink Ruler

I’m making a luchador necklace for Eli (with big manly links. It’ll be tough!), but I lost the original sketch of the masks. No problem, I could recreate those, but I couldn’t remember how big the shrinky dinks were before I shrunk them in the oven. So I got out a ruler and applied my mathematic skills.

It turns out I have no mathematic skills.

I now have five beautiful 3 inch long luchador masks. Okay, they will make very nice fridge magnets (although I think they should be backed with another layer of plastic for stability), but they're way too large for a necklace.

Clearly I needed some kind of tool.

I made one.

Now I don’t claim to be the only one to have thought of this, but it was an original idea for me. After all, bats and birds both developed flying abilities wholly separate from one another.

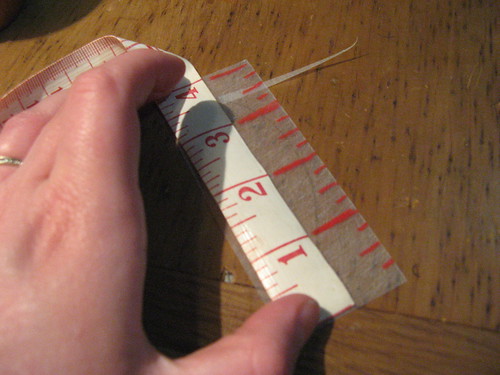
I took a scrap piece of Shrinkydink and laid a measuring tape next to it.

I then marked off all of the measurements on the plastic.

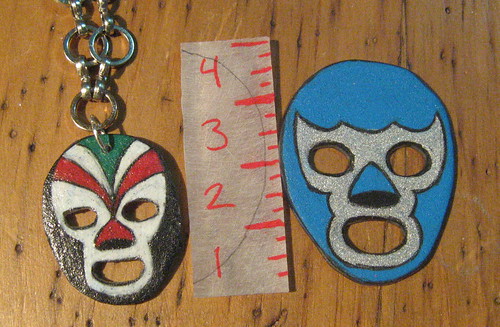
Then I baked it in the oven, shrinking it down. All shrinky dinks of the same brand should shrink to the same proportion.

Now I can tell how big a shrinkydink was before I baked it!